The best way to use Highlight and Contour on your faces is to know exactly where to highlight and where to contour your face. Here you can Find Out How to do highlight and contour yourself, and the results are going to be Flawless, Glow, and Beautifully Sculpted Face.
2. Choose the right shades and right tools for application
A great foundation is a must for flawless-looking skin, so before you start, you will need to select Three Shades of Foundation and Powder in Three Different Depth Levels and color, this is just one piece of the puzzle to look your skin amazing and flawless. Realizing your true skin color is mainly about getting your perfect skin’s undertone, which usually, in turn, is very essential to create a best and flawless makeup look. Whenever selecting the correct color choice with your foundation, you have to consider two extremely important factors: Your skin`s Undertone and your skin Depth Level.
We will start with the easier of the two and that is the Depth Level. The depth level of your foundation (and your skin) is how light or dark it appears. If it lighter is, the lighter its depth level is; if it darker is, the darker its depth level is. Very easy enough, right?
Right now, for the harder from the two, realizing your skin`s Undertone. A lot of this has to do with the skin’s undertone. This relates to your natural skin colors beneath the surface of your skin. Realizing your skin’s undertone is definitely the key to help you choosing the correct foundation and selecting the best color palettes for you. To help you completely explain this, I need to split all of you ladies into two groups: ivory/beige and bronze/ebony.
Each time dealing with the ivory/beige skin, you will be seeking three possible undertones: pink, yellow, or olive. If perhaps you have bronze/ebony skin, you have got essentially three undertones as well: golden orange, yellow (gold), or warm brown. This is important to note the fact that your undertone is definitely not the exact thing as your natural tone as well as the color of your naked skin. Basically, the fairest skin may easily have warm undertones and so more dark skin might just have cool undertones.
No matter what skin color you have got, Strip Tests are the only way to help you discover your ideal shade match. Stripe testing is when you will take multiple shades of foundation tone and apply them to your skin to help you, test if they match your skin`s undertone and depth level. You will need to stripe test from your jaw to neck mainly because this way you extend your shades on to your neck to ensure a perfect match.
A large number of women with ivory/beige skin have got a pink or redness on their face, yet not on their neck. However, the most important goal is to match up with your neck color. The only time you will want to use a pink undertone is definitely when you have pink on your neck and your face.
Finally, the undertones on bronze/ebony skin happen to be very specific, so it is primary to get an exact match. Whenever stripe testing bronze/ebony skin, you should apply the foundation from cheek to jaw. This is mainly because it is most likely for this kind of skin tone to have more color variations on the face, and you will want to be capable to find what you will need to help to make your skin look perfect. Although still need to make an effort to match your neck.
Get a foundation in three shades: one for Matching Your Skin Color, second to Highlight, and the third for Contour.
The first color should match your skin exactly. It is your accurate foundation color.
That second color, generally your highlight color, will need to be one level brighter than the first color, ideally with that same undertone.
Finally, the third shade, your contour color, will need to be one level darker as opposed to your first, when possible with the same undertone.
Finally, the more impressive the final result is, the even more dramatic the contrast between the three colors depth levels should be. As a great example is: If perhaps you want your contouring to make sure is more noticeable, you should use a shade that may is two or three levels darker as opposed to your natural shade. In this method, you will develop a more remarkable result.
If perhaps you have dark ebony skin, you should choose a highlight shade that is two or three levels lighter as opposed to your natural shade to create contrast and to get also more impact out of your sculpting. The more dramatic your selections are, the more effectively and properly you will have to blend the shades together.
Hold in mind that with the ivory/beige, contour more than you highlight, and with the bronze/ebony skin, highlight more than you contour.
A good example is that a one-size-fits-all system or solution is not really viewed as to be appropriate for everyone in “the undertone box.” If perhaps you are still confused or feel like you flit between both cool and warm undertones, in that case, you are most likely Neutral.
For highlight and contour, you will need:
Sponge-Beauty blender- The better the quality, the better the application will be, allowing for perfect an airbrushed finish of your foundation.
Detailed Powder Brush- This kind of natural-bristle brush is definitely the greatest for detailed powdering. Because of its shape and size, it is best for powdering in small areas, like under eyes and eyelids. Right now, there is the best brush for applying powder highlights and face shimmers with perfection.
Powder bronze/blush Brush-This natural-bristle brush is definitely so adaptable and special! It`s ideal for loose and pressed powder application, incredible for removing excess loose powder after powder-puff application (baking), and important for detailed blush and face contour application. Finally, the ideal tool can simplify bronzing and as well, improve your results.
3. Step by step how to sculpt your face
The application takes only 4 basic steps:
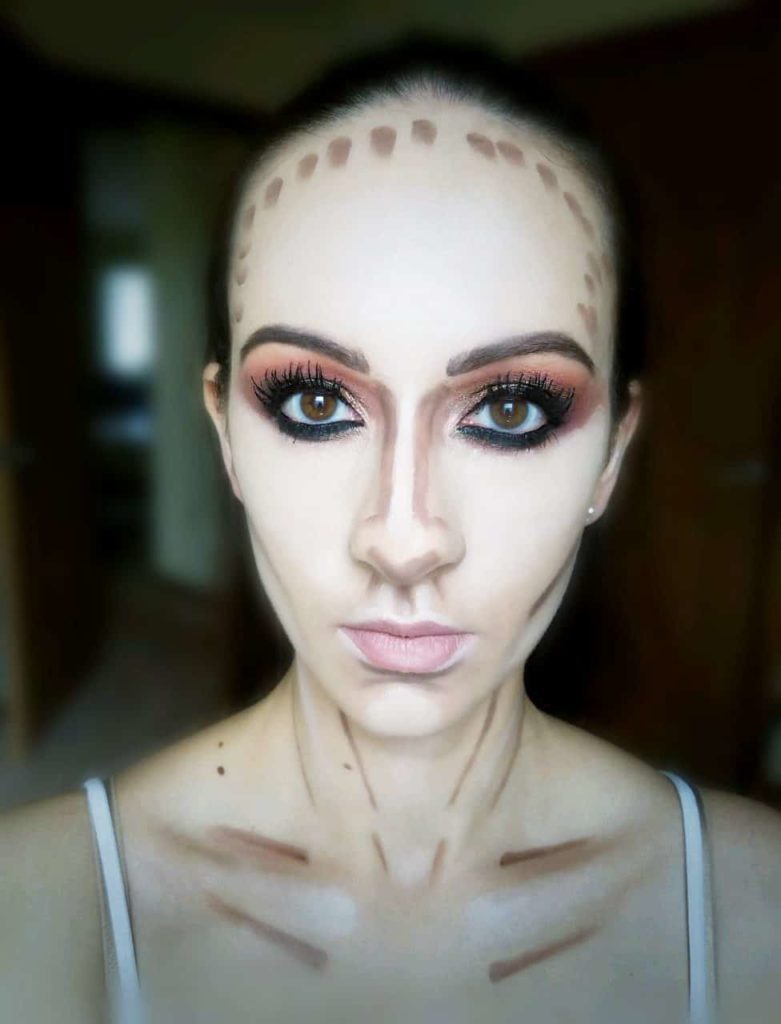
1. Start using your 1st or true foundation color over your whole face. After that imagine an oval on your face. Which usually wider of the whole oval is usually from your eye sockets; the height and length are your ovals extend right from the tip of your forehead to the tip of your chin. The purpose you do this is that it allows you to see where to highlight and where to contour.
2. Apply your second highlight foundation color to the very high points within the oval, which usually includes under the eye, your forehead, the tip of your chin, and at the top of the cheekbones. The part where you highlight will absolutely be what that eyes will focus on first. As a result, you`ll be drawing attention to the narrow area on the center of your face and so away from those sides.
3. At last, apply your contour foundation color to the areas outside the oval, which usually includes the sides of your cheeks down to the jawline, the temples, and along your hairline. By contouring the outside areas, you are visually helping those areas recede, making your face appear narrower and more oval.
4. Blend everything very well. The key to this blending technique is appearing natural.
Foundation can be tricky. By matching your skin color to help you make the ideal shade and so selecting a method that functions for you, to determining that right quantity of coverage, there is a ton to consider if perhaps you’re after a perfect finish. The moment you have finished applying your three-foundation shade, easily powder with a shade that matches your natural skin tone. This will not negate all the work you have got just finished, but it will set everything gorgeously and superbly.
If perhaps you want your results to turn into even more dramatic and perfect, you can certainly end with 3 shades of powder: 1st that matches your true foundation color, second that matches your highlight color and a darker or matte bronzing powder to match up with your contour shade. This kind of application improves and enhances all of your work and gives you a perfectly sculpted, three-dimensional effect that will make any face shape looks more oval and add that ever-so-important glow and buildup effects.
Highlight Powder
• The idea is to use a sheer translucent highlight powder with no shimmer.
• Apply it with your Detail Powder Brush underneath your eye on top of the cheekbone.
• Now apply to the center of your forehead.
• Apply to the tip of your chin.
• Now with your Powder Brush blend off the excess highlight powder.
• Simply by using highlighter very easily, you give your skin a good wonderful color boost.
Highlighter basically takes a few seconds to apply primarily because you just apply this to a couple of small areas of your face. However, simply a few dabs of highlighter can quickly brighten up your whole face.
Contouring Powder
You may use either matte bronzer (no shimmer bronzer) or a deeper shade of powder.
Different face shapes will certainly require different contouring methods, several will certainly need a lot more highlighting while others will make use of a lot more contouring to enable you to make the shape you are confident with.
- Using your Powder bronze/Blush Brush, start using your matte bronzer at the back of your cheekbone and sweep it forward toward the apple of your cheek. After that take the brush back towards your ear. This kind of application sets the color in place.
- Now take on your brush and work within the opposite direction (up and down) to blend. Always be sure to blend well, or it will certainly not look natural.
- Don`t neglect to add a little at the temples to help shape your face. Apply the bronzing powder up around the temples and eye sockets.
- Now use your bronzer down your jawbone to help make a good shape.
4. Final results and extra tips
Ultimately, after you finish everything, see the results in the mirror from all different angles facing a very light room (like window light). That way you will see if everything is well blended. And so, now is a time for some more highlighting with shimmer.
Shimmer highlight should be applied:
• On the top of your cheekbone
• On the temples across the forehead like a C
• On the inner corner of the eyes
• Under the eyebrows
• On the top of the “cupid’s bow”
• On the side of the lower lip
• The middle of the lower lip
• On the middle of the nose horizontal if you what to make a wider face and vertical if you want to make a long face
• And on the center of the chin
1. EXTRA TIP:
Finally, the contouring trend includes your décolletage. Simply as you use the highlight makeup technique to make sure your cheekbones pop, you also can add dimension to your clavicle and as well chest to get a touch of sultriness. You can also contour and highlight your neck and décolletage area simple by:
- First, apply your match color foundation on the neck and décolletage.
- Second, make two lines with your contour color.
- Then you can contour the bone area on the décolletage from the outside and from the inside.
- In the end, you can contour the middle line of décolletage between your breast and across like a Y on top of the breasts. Although the results are planned to be simple, you should certainly see more depth on the contours from your chest and neck due to a sun-kissed glow surface finish.
- Right now, you blend everything very well.
With a lighter foundation:
- Highlight the middle part and the sides of your neck
- Then the bones of both sides on décolletage and under the Y and inside Y.
- And blend.
- Then you can also apply shimmer on the top of the highlight just on the bones and the middle part of the décolletage area.
2. EXTRA TIP:
Cover your ears with the right match foundation, that way everything will look together exquisitely and magnificently.
3. EXTRA TIP:
- For bigger lips apply the darker foundation under the lower lip and on the gap of the “cupid`s bow” under the nose on both top sides of the upper lips, and blend.
Immediately after completing each of these steps, your posture will certainly improve and your expression definitely will be better.
I hope you will practice all these steps, have a perfect overall glow, and have fun with results of perfectly sculpted face and be happier with the outcome.
Good Luck!